
How to order license to a Siteshop CRM Connector for Dynamics 365
Introduction
Siteshop CRM Connectors are provided by Siteshop ApS which is a Microsoft ISV Partner.
You can order and pay for a license to a Siteshop CRM Connector the same way that you order and pay your Microsoft Dynamics 365 licenses.
If you have a Microsoft Customer Agreement (MCA) or an Enterprise Agreement (EA), purchases from Microsoft Marketplace can be added to your existing Microsoft invoice in order to keep the overview.
The billing profile must be set up in the Microsoft 365 Admin Center or Azure Portal, depending on the type of subscription.
Prerequisites
Notes for customers with CSP Agreement
If the customer is under a Cloud Solution Provider (CSP) agreement, their Microsoft partner may need to be involved in the purchasing process. The partner can assist in managing the subscription and ensuring the licenses are correctly assigned. This is done in the Partner Center.
Notes for MCA (Microsoft Customer Agreement) and EA (Enterprise Agreement) customers
To order a Siteshop license to a CRM Connector, make sure invoice payment is enabled in your Billing Profile.
If you do not have a Billing Profile with invoice payment enabled, be sure to have the Global Administrator or Billing Administrator role and follow the guide below.
Enable invoice payment in a Billing profile
First you need to add a new Billing Profile.
Note: To create a new Billing Profile, you must be one of the following:
- Global Administrator
- Billing Administrator
Read more about Billing profile: Get started with Microsoft Customer Agreement billing account – Azure – Microsoft Cost Management | Microsoft Learn
Required permissions
To change the payment method of your new Billing Profile, you must be one of the following:
- Billing Profile Owner
- Billing Profile Contributor
If you made the new Billing Profile yourself, you should be “Billing Profile Owner“
Step-by-step: How to enable invoice payment in a Billing Profile
- Sign in to the Microsoft 365 Admin Center: admin.microsoft.com
- Go to Billing > Billing accounts
- Select the relevant Billing Account, then go to the Billing Profiles tab
- Click on the desired Billing Profile to open its details
- Under Payment method, click Replace
- Choose Wire transfer as the payment method, if invoice payment is approved for your account. If this option is not
available, you’ll need to contact Microsoft support to request invoice payment activation - Fill in the required details (bank info, PO number, etc.)
- Click Save to apply the changes
Notes
- Invoice payment (wire transfer) is only available for MCA and EA customers, and must be approved by Microsoft
- If you purchased through a Microsoft representative, invoice payment is usually enabled by default
- You can also add a PO number and additional invoice recipients under Invoice settings
How to order Siteshop CRM Connector license through Microsoft Marketplace
Prerequisites
As mentioned earlier, you need a MCA or EA that contains a Billing Profile with Invoice Payment enabled, to order a license through Microsoft Marketplace.
1 – Find the correct SMART CRM Connector in Microsoft Marketplace
Note: In this guide the “Hubexo SMART CRM Connector” will be used as an example. The following procedure for ordering any license for the Siteshop CRM Connectors for Dynamics 365 is the same.
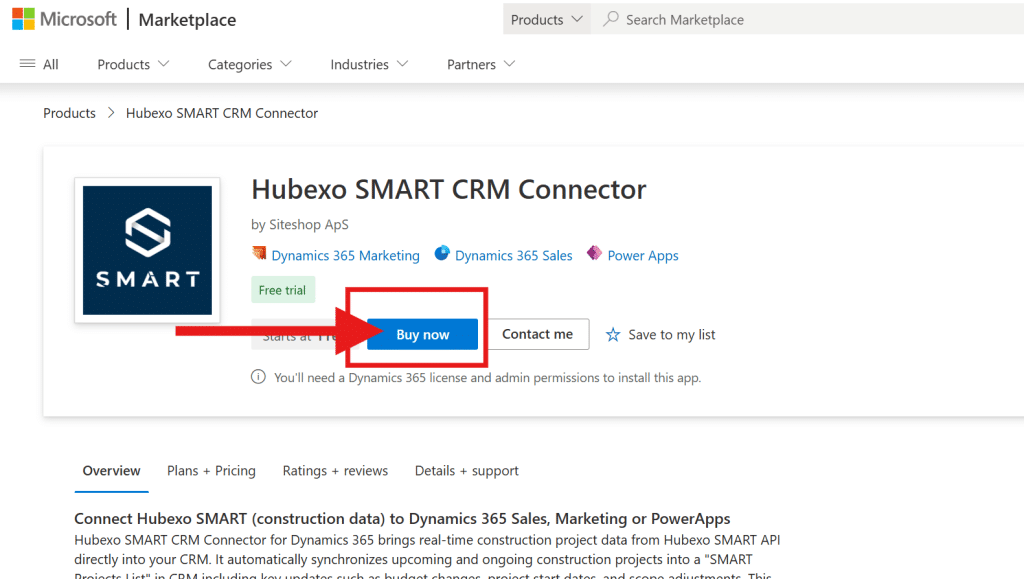
Go to Microsoft Marketplace and find the desired CRM Connector.
Click the “Buy now” button.
2 – Select plan
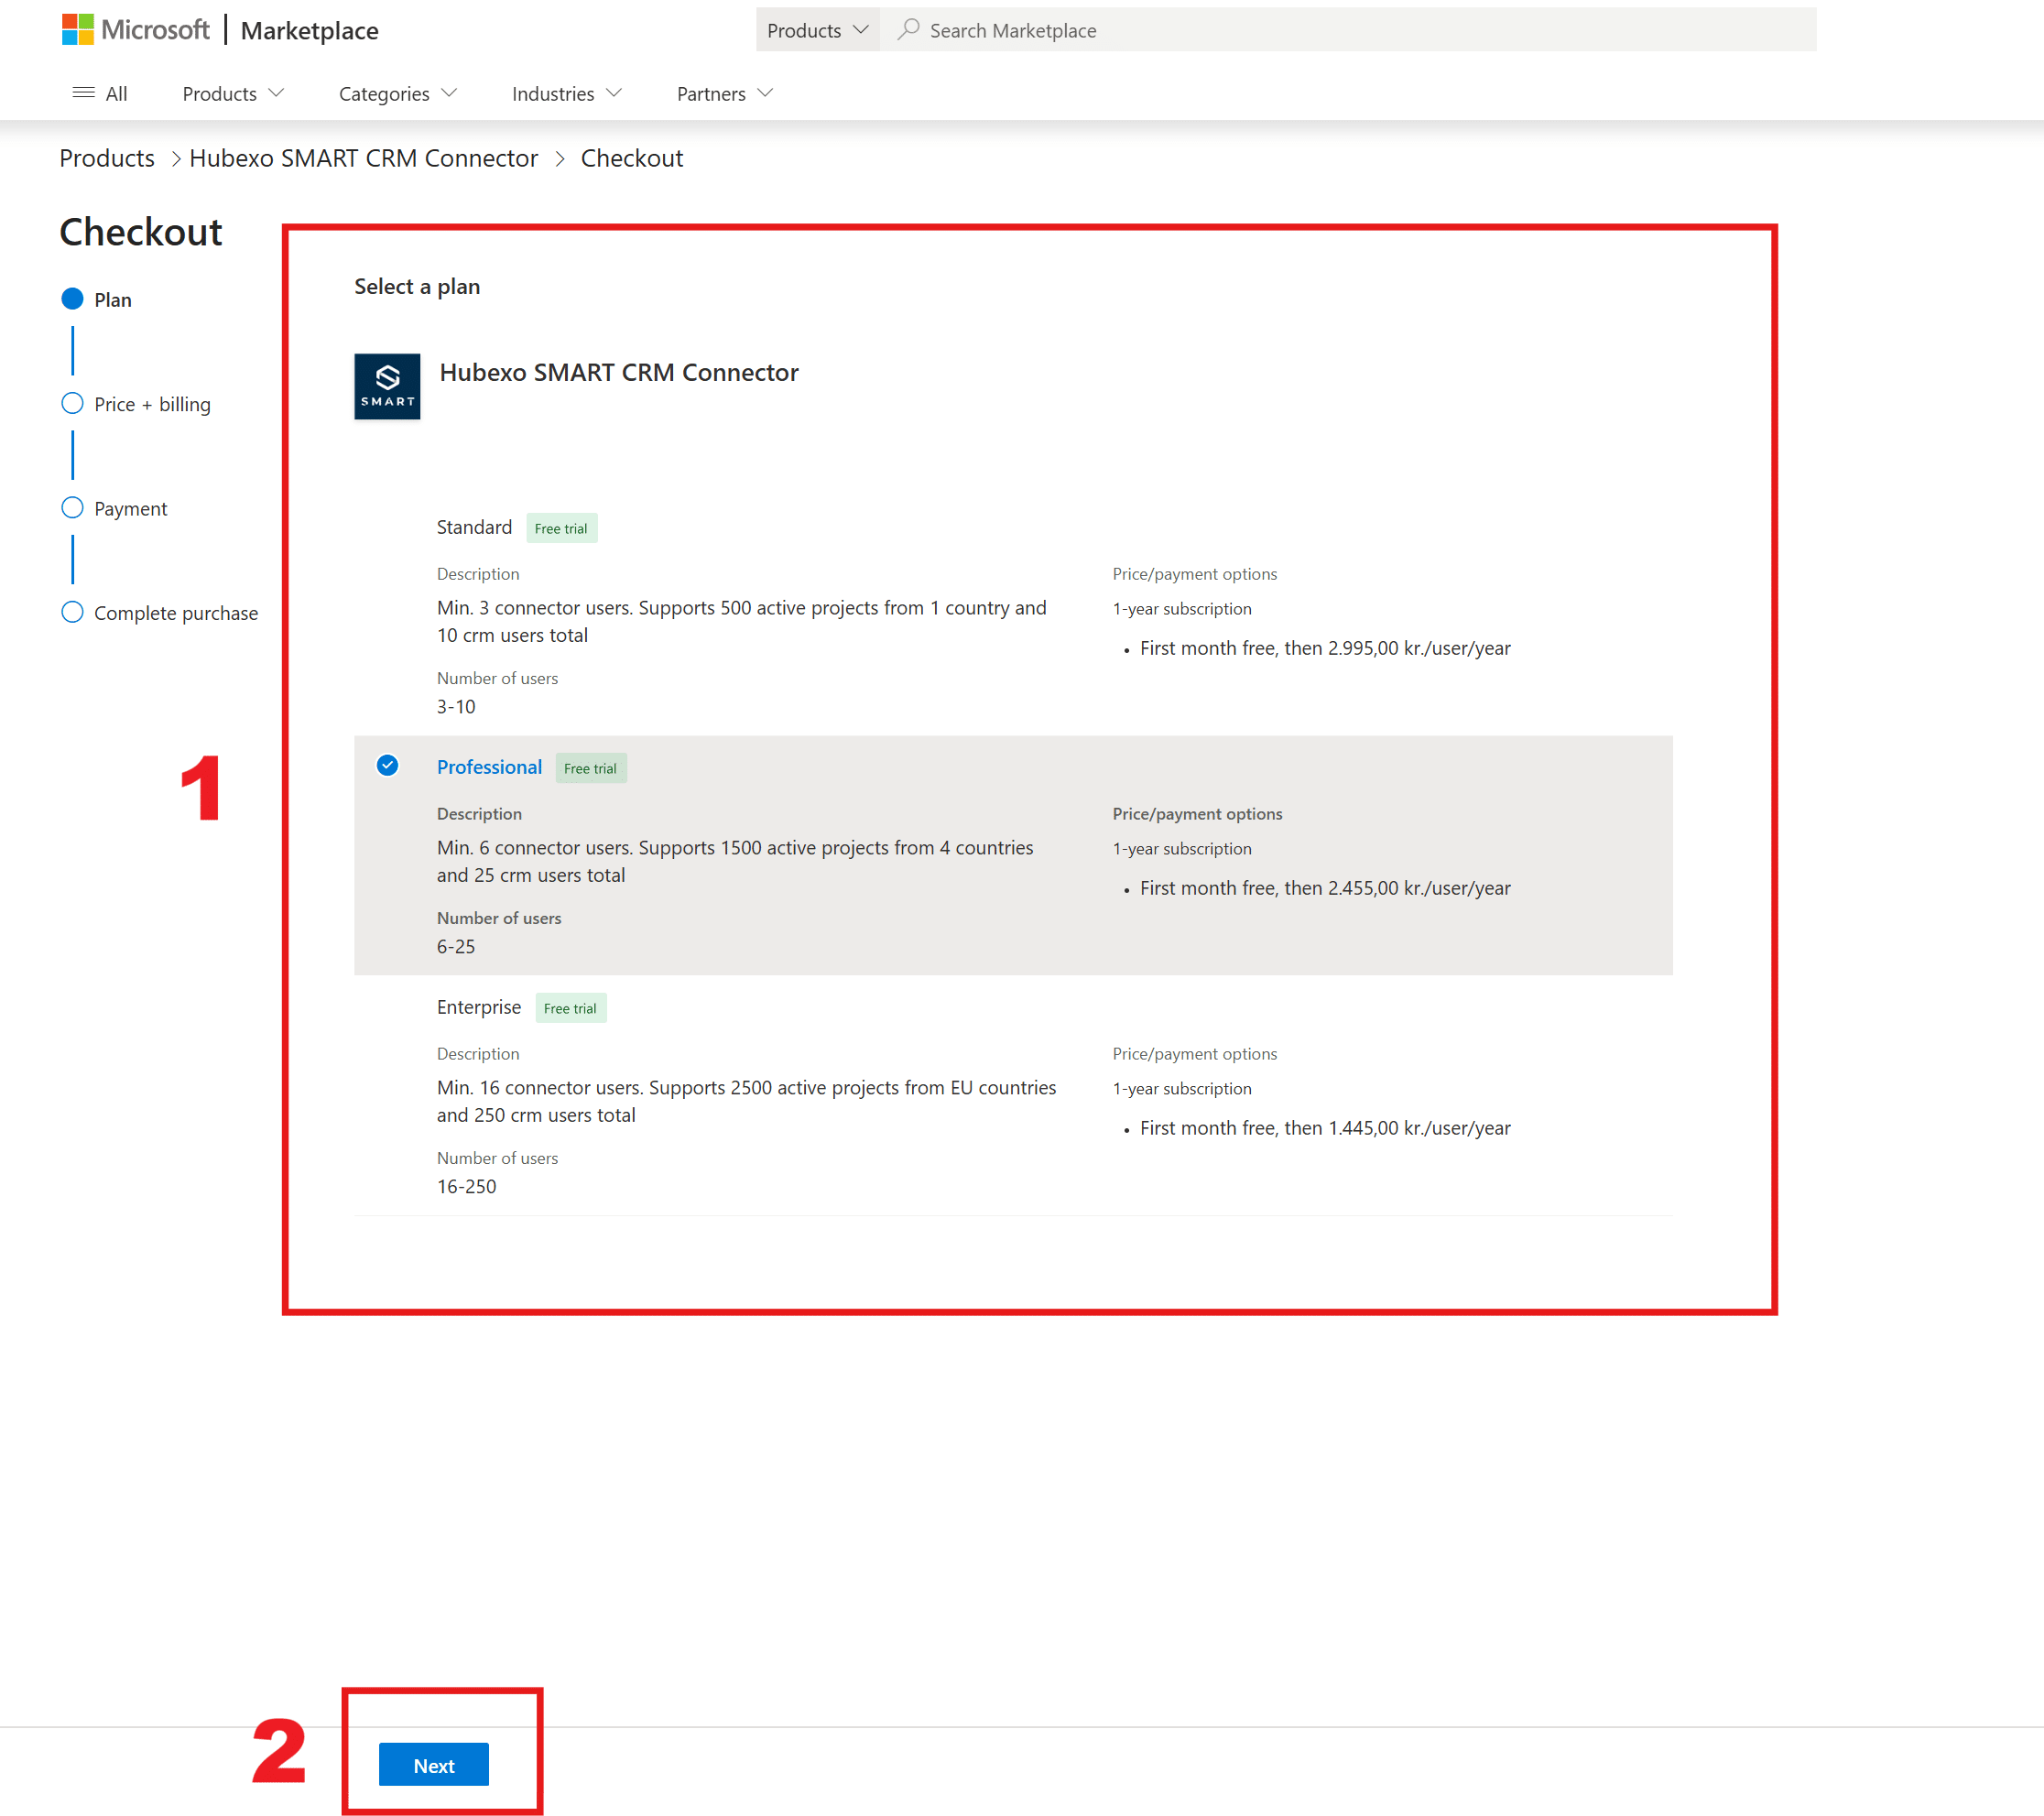
- Select the correct plan (depending on different parameters like number of CRM Connector users).
Note: If you are in doubt please contact your Siteshop sales rep. - Then click the “Next” button
3 – Validate your selected license
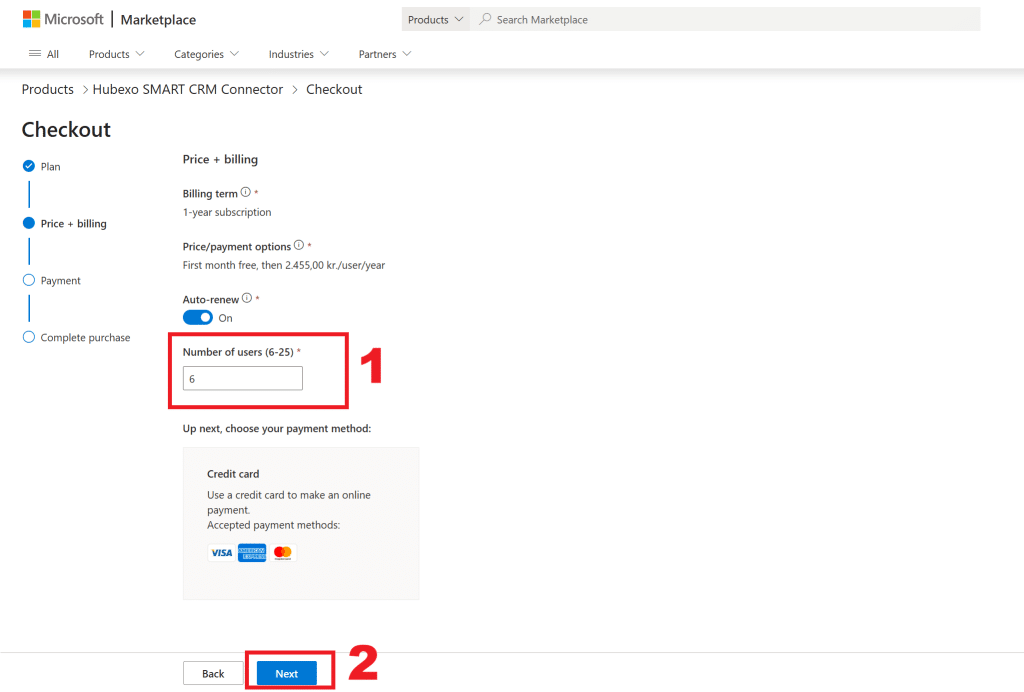
- Verify the number of users
- Click the “Next” button
4 – Select Billing account and Billing profile
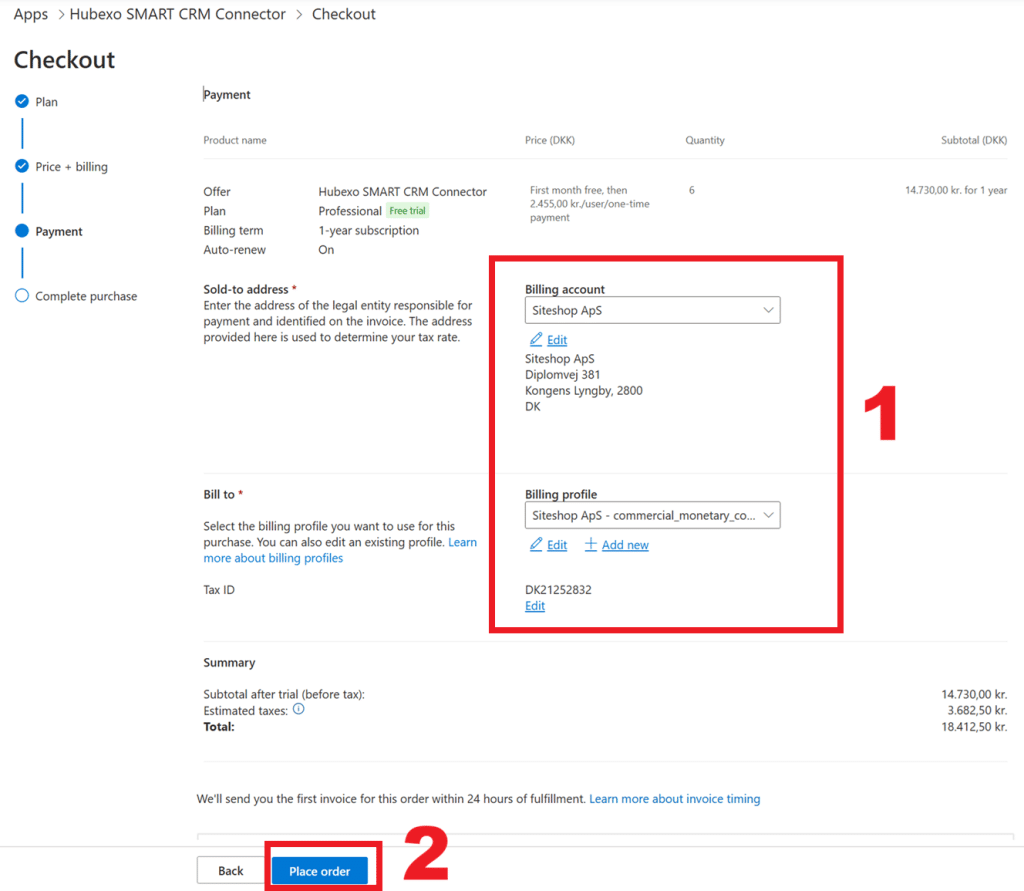
You can select a Microsoft billing account the same way you handle payments for Dynamics 365.
Select
Note: If no Billing Profile is shown, but a section with payment methods is, go to the section: Enable invoice payment in a Billing profile
- Select the desired Billing account and Billing profile
- Click the “Place order” button to order the subscription
Now you have successfully ordered a Siteshop CRM Connector license.